
I wanted to make a big tote bag. One big enough to be carry-on luggage for a short weekend interstate. I went trawling the internet for tutorials and patterns. I fell in love with Amy Butler’s Weekend Bag – who wouldn’t?

I fully intend to make that at some point in the future, but I would have had to order the pattern and I wanted to get this underway immediately. (Yes, I am the kind of person who decides to make a bag for a trip that is next weekend. I love me a deadline.)
So eventually I found this ‘Weekender’ bag. It looked great, and the tutorial seemed pretty straightforward; plus I had pretty much all the materials I needed in my stash.
However.
Let’s be clear about one thing. The bag in the picture below is not the bag you’ll make in this tutorial. The bag in the picture is The Lex Trip Bag from PropertyOf. I didn’t read the tutorial’s fine print. It does say ‘featured bag’ in tiny writing down the bottom.

Nice, isn’t it? It would want to be for 289 quid.
I only really realised this when I was halfway through the tutorial. But, still, my bag was looking pretty cool, and my poor old retro sewing machine was actually doing quite admirably with the vinyl. But I thought I would mention a few things that I would do differently if had another go at this bag pattern/tutorial.
Struts. This was the first bit that didn’t quite work. The pattern sets them at 17″ long, which is 1″ short of being neatly covered by the vinyl at the bottom and the zipper placket at the top. Below is the bag with the struts pinned in place. See how they don’t quite reach the top edge? I ended up cutting an inch off the top of the bag (rather than a whole lot of unpicking!) That wasn’t a big deal as far as the size of the bag went, as it is very roomy.

My advice would be to actually make two struts, long enough to go all the way under the bottom of the bag and up the other side. This would provide extra strength to the structure of the bag and only require a few extra inches of sewing. You’d add them at the same point in the tutorial, and the vinyl would still go over them. So instead of cutting 4 struts 17.5″ long, you would cut 2 struts, 44″ long (you could join them if your fabric wasn’t wide enough). I didn’t do this, but here’s a diagram of what I mean. 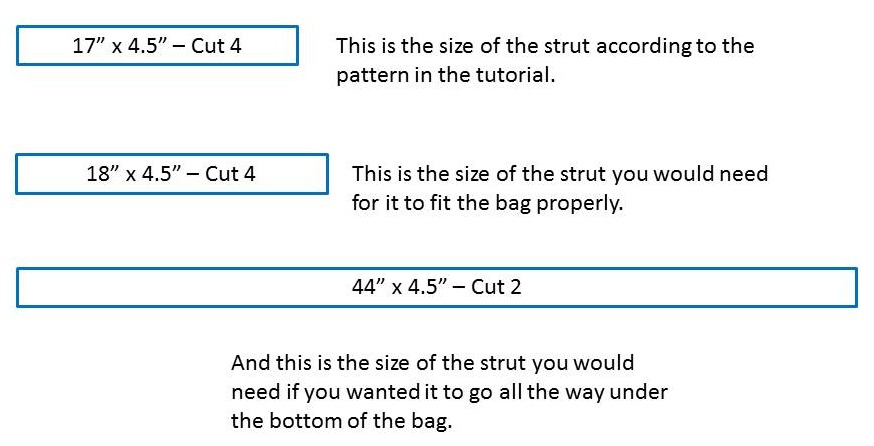
(Note – It’s entirely possible that I misunderstood the tutorial, and that the instructions for the zipper would have taken care of the struts’ raw edge; but as I describe below, I found the zipper instructions difficult and did it a different way.)
Handles. If you follow the pattern you end up with a 1″-wide tube. It’s too narrow. I doubled the width; that worked. You might also use some interfacing and/or batting, but keep in mind you have to sew through two layers of vinyl and two layers of strap to put the fancy trim on.
Working With Vinyl. If you have a normal sewing machine – like me – and don’t have a fancy walking foot – like me – here’s what you do. I found this tip on Pinterest a while back and finally got to put it to the test. Get some MagicTape (you know, Scotch tape, the stuff you can write on with a biro). Pop the foot off your sewing machine and apply a piece of magic tape to the bottom of it. It stops the vinyl from ‘sticking’ to the bottom of the foot. It mostly worked :-). Also, don’t pin your vinyl – the pinholes don’t go away. I muddled through with the help of some more magic tape, but I think it would have been easier with some quilt basting spray.
If your vinyl is a bit creased from storage, like mine was, lay it out flat in a hot sunny spot. It will take a couple of days but it will gradually warm and flatten out. If you’re impatient, a hair dryer and a couple of heavy books might do the same thing.
Lining. The pattern/tutorial is for an unlined bag; given the sheer amount of stitching involved (the inside of my bag was not the neatest creation ever!) and the fact that I had some cute fabric going begging, I decided to give it a go. All I did was cut out another bag piece in the lining material and sewed up the sides and the box-corner opening at the bottom. I also added a zippered patch-pocket on one side of the lining.
I discovered later, when I was doing the zipper, that the lining did not need to be as tall as the outer bag and ended up cutting it down. If you’re lining your bag, check your measurements before cutting; it will need to be shorter by 4-5″. Leave a segment of one side seam open, as you’ll need to turn the bag right-way out.
Zipper. I found this part of the instructions the trickiest, and actually just ended up doing it like it was a lined zippered pouch! The pattern has you cutting two zipper plackets; cut another two in the lining fabric. If you wanted to add some interfacing here, go right ahead – not too stiff though or it will look weird. Sew the plackets to the zipper like you’re making a really long, skinny pouch – here’s a good tutorial. Now, sew the ends of the plackets together, just as you would with a zippered pouch (being extra careful of the zipper teeth.)

Open the zipper up. You should have something that looks like a big circle of material with zipper teeth along the middle.

Put the outer bag inside the zipper circle, right sides of outer fabric together, and pin it all the way around. By some miracle, mine matched up perfectly. Sew it all the way around.

As mentioned above, I had to cut down the top of the bag a bit because the side struts were too short and were showing a raw edge instead of being covered by the zipper placket. However, if you’re reading this tutorial, you’ll have cut your struts longer anyway!

Before you add the lining, sew on the D-rings at the sides for the shoulder strap. My sewing machine refused to do this bit and I ended up handsewing them! It’s not a terrible job but I reinforced them with some studs just in case.

Lining. Okay, so now attach the lining to the zipper placket’s lining, pretty much the same way you did the outer bag to the zipper. You’ll be able to turn the whole thing through the opening you cleverly left in the lining seam. Then you can either handsew or topstitch that opening up.
To make the bag look a little bit fancy, I topstitched the zipper placket about 2cm down from the seamline – it makes the zipper sit ‘inside’ a little bit (you can see what I mean in some of the finished pics). This was another reason why my lining needed to be quite a bit shorter than my outer bag.

Shoulder Strap. I did have a yellow canvas belt that I was going to use as a shoulder strap, but I wasn’t able to find hardware that I fit it properly, so I ended up cannibalising a shoulder strap from a sports bag I already owned, and jazzing it up with a matching padded shoulder protector. I do intend to go back and add the yellow belt once I’ve found the right size hardware, but until then, this’ll do!

Bag lining with zippered pocket
I love making little zippered pouches so I couldn’t help but make a couple to match this bag; I’ve found packing pouches to be very helpful when travelling.

And you are done! Go get on a plane, because after all that hard work, you deserve a break!

Oops – I nearly forgot to mention one of my favourite features of this bag: nothing new! By that I mean I didn’t have to buy any new materials to make it. The lining, green metal zipper and outer fabrics were op-shop finds, the vinyl and the red studs were in my stash from a previous project. The d-rings were salvaged from an old belt. So it was a stash-buster bag as well!

March 3, 2013 at 1:21 pm
And it looks so professionally finished when you see it in real life! Little makebaker triumphs again!
May 10, 2014 at 2:02 am
Hi! I’ve been following your web site for some time now
and finally got the bravery to go ahead and give yoou a shout out from Humble Tx!
Just wanted to tell you keep up the good work!
September 21, 2014 at 5:55 am
Thank you, thank you, thank you for your tips! I’m thinking about making this bag, but going over the pattern left me a little bewildered. Your bag looks amazing!
October 8, 2014 at 4:35 pm
You’re welcome – good luck with the bag 🙂
October 22, 2014 at 7:52 pm
thank you so much for these instructions. I was very close to take the fabric I bought and cut for the weekender bag and throw it out of the window. To give it one last try, I searched the web for some help with the zipper part – finding it definetly to complicate to follow and – tadaaaaaaaaaaaaaaaaa- your pictures popped up! With the help of your experience, I will go back to my sewing machine and finish this project.
Many greetings from Bavaria!
February 25, 2017 at 1:32 am
[…] at some bags you own/photos of the finished bag it’s pretty straightforward. I also found this blog post of someone who made it and shows some of the steps, which was helpful. The main confusion is the […]
December 19, 2017 at 6:01 pm
Very nice, thank you!