No, actually I’ve got no idea if that’s real French, but it looks cute so I’m keeping it.

At time of writing (July 2021) Sydney is under it’s second big lockdown since the start of the COVID pandemic. Working from home means all the time I would normally spend travelling to work now gets used in the sewing room, so I have been reasonably productive. However it’s not been easy to take decent photos, so until I recitify that, I thought I would do a roundup of the cosplay outfits I’ve made over the last couple of years. Some have been blogged separately, some not. Read on!

Way back in 2017 I made a rockabilly-style dress out of a Batman sheet I’d picked up at an opshop ($3 if memory serves!). I wore it to SupaNova that year, first time I’d been to a nerd convention and I had a blast.

Pattern is Threadcount 1613. There’s a built-in underskirt of blue lining-weight taffeta which gives it a really nice shape. And a matching handbag, too. I did start blogging this but never finished writing it…. sorry folks.

The second nerd convention I went to Nullus Anxietas VI, so of course an outfit was required for that as well. I hit the local fabric consignment shop and stocked up on some stretchy gold fabric for my take on the Master of the Ankh-Morpork Mint.

Skirt is Lindy Petal Skirt by Itch To Stitch (a free pattern) and the jacket is a cropped version of an old Style pattern, #2769. The vest was a last-minute addition, whipped up from some scraps left over from a refashion of a fairly hideous thrifted gold blouse. Tacky glitter top hat from the party warehouse, and I found a pug keychain at a jewellry store so I could carry Wuffles around with me as well.

Then of course there was Nullus Anxietas VII, which I was only able to attend one day of (such a pain when my worlds collide, but karate took precendence that time). One day I was walking past an op shop which was having an ‘all items $2’ sale. Two pairs of almost-matching jeans in hand and the idea for the Bill Door costume was born! I removed the zip and waistband from one pair and opened up the side seams, then added a facing and some snaps; cobbled together a bib and straps from the other jeans and whacked on some hardware from the stash. One back pocket became the bib pocket!

No, I didn’t make the skeleton bodysuit! Found that one – and the socks – on eBay. The socks glow in the dark, too. The gold lifetimer is an actual eggtimer, painted with gold paint and glitter.

And of course there’s Idris. At the time of the Doctor Who 50th Anniversary Special, I was heavily into refashioning and buy-nothing-new. So I challenged myself to make a costume completely out of second-hand materials. It was a magical time; what I couldn’t find in my stash appeared with genie-like coincidence every time I hit an op shop. I have actually blogged this one.

And of course there’s The Coat. This one I made for the time Peter Capaldi and Jenna Coleman did a Q&A onstage after a screening of the first episode of the new season – I geeked out. It took hours and hours and hours of hand sewing, and some seriously imaginative pattern jigsawing.

So what’s next, you wonder? As if a geek like me doesn’t have seventeen projects simmering away in the back of my head! Well, there is a project underway, more of a prop than a costume but it’s coming along nicely (slowly, but nicely). And I’ve been collecting fabrics and supplies from op shops and the Sewing Basket with another special frock in mind – maybe I’ll get onto that one of these days as well.

Previously I’ve mentioned the fun that can be had by using a contrast colour in the serger to finish seams. One of the first places I did this was with a black-and-white t-shirt. I’m gonna talk more about that t-shirt in a minute, because I did toile the pattern before cutting into the pretty fabric, so we’ll have a look at that one first!

Wearable muslins are the best! This is Burda Magazine Top 113 from 08/2018. It’s a very square, boxy shape so I wasn’t sure if it would just look like a sack on me, but I was pleasantly surprised by the result.

The fabric I used for the toile was all from the stash – some black cotton knit with a little spandex, and some pale grey french terry left over from another project (another one I haven’t blogged about, and originally a remnant from The Fabric Store).

Incidentally, it was chilly when I took the photos, so I’m actually layered up with a Seamwork Elli in a remnent of thermal jersey from The Fabric Store. It’s lovely and cosy 🙂

I like this pattern not just for the look – that diagonal seamline is fun – but because I had a feeling the pattern pieces would lend themselves to using up odd shaped peices of fabric. I was right for the most part, although I did have to piece a couple of bits of the grey fabric on the back. And I got distracted by that piecing exercise and ended up cutting that upper back piece the wrong way around! Oops. It wasn’t a big deal – the black knit looked the same on both sides so I just flipped it over. So the seamline is the opposite of what it should be on the back, but I wasn’t worried as it was a toile – turns out I quite liked the effect anyway though!

I used the coverstitch and some pale grey thread to join my pieces for the upper back. I kinda like the effect.

Okay, on to the real deal! This gorgeous deco-face fabric I snaffled up at a Spoolettes Fabric Swap, last year I guess, or even the year before. It was an offcut of a border print, the majority of the remainder was the dandelion print (they look like dandelions to me. Could be poppies, maybe? For the purposes of this blog, I shall refer to that part of the fabric as ‘the dandelion print’) with some bits of the face print at one edge. Lucky for me it was the perfect partner for this pattern.

As is often the case when I’m deep in tho pattern placement zone, I didn’t take any photos of the pattern layout on the fabric. Which is a shame because I was really enjoying that challenge and it would have been fun to show you. Ah well.

It’s a very simple pattern: two front pieces, two back pieces, hem and neck binding pieces, and the sleeve/cuff piece. Any shirt finished with a hem band or sleeve band is a winner for me. Hemming is not my favourite activity, but whacking on a band – usually with the overlocker – makes it so, so simple to finish a garment.

Oh, wait, we were talking about inside details, weren’t we?

Front, showing the diagonal seamline, sleeve cuff and the contrast thread on the neck binding. You can see the lovely deco face print nicely in this photo.

The ‘tag’ is made from a length of tape-measure-print ribbon I picked up at the Sewing Basket a while back. I love having a tag on the back of shirts or pants (I mean, legit, it makes it easier to get dressed, let’s be honest here). I do have some of the adorable KATM labels but I’ll usually save them for fancier makes, but a couple of inches of this ribbon makes a really cute ‘tag’ for simple sews like this top.

This here is the back. Are the faces upside down? Sideways? Is it off grain, or perpendicular to the grain? Can’t really tell, right? So it totally doesn’t matter. You can also see a slight fade line on that upper section, like it was folded in someone’s stash for a while, but I don’t think it’s noticable enough in this print to matter.

The thread looks red in this photo, but it’s actually hot hot pink. And nobody knows it but me.

Oh, and you folks.

Obligatory cat photo. Look, she matches the top.

Yes, she’s not a fan of cuddles, but we have an arrangement: I provide food (and games, and a heated bed, and plenty of pats) and she occasionally, reluctantly, allows a brief cuddle, provided there’s also lots of ear-scratching involved as well.

As it turns out, when you run Russian pattern instructions through Google Translate, you end up with some truly hilarious results. And when the instructions are from a Burdastyle magazine, anything could happen!

Still, thankfully these trousers were a fairly simple construction and after one toile in some dark blue crepe, I felt comfortable cutting into one of my precious Japan-Haul fabrics.

These are trousers #110 from Burdastyle Magazine January 2017. I’d wanted this edition originally for the Activewear feature, but because of the delay of the English version of the magazine arriving on Australia shelves, I missed it and never got my hands on a copy. The only one I could find online was a Russian edition, and the seller assured me it included an English translation.

It did not. Whole thing was in Russian.

Hence the google translate attempt.

However, they weren’t a complicated make – wide trousers with a cuff hem, flat front pleated waistband and elastic at the back waistband. So I went ahead and figured it out as I went along (and let’s face it, with Burda Mag patterns, that’s pretty much what we do anyway, right?) I consulted a few other patterns with similar waistband treatments, and came up with a plan.

I did not do the back welt pockets, and although I considered adding side pockets I did not do it. I was not sure with the elastic back waist, how pockets would sit and if they’d be better as side-seam pockets or slant pockets. I regret not adding them – I had enough fabric – and sure, I could go back and unpick some of the side seam and slip them in, but it’s pretty rare for me to go back and re-do something on a fully finished garment. So they remain pocketless.

The fabric I used is one from my first trip to Japan, back in 2016! My first time in Nippori, rightly also called ‘fabric town’. When I first saw this fabric I knew it was destined to be a pair of wide-leg pants of some kind but I guess I was just waiting for the right pattern to show up.

Nearly all the fabrics I have bought in Japan have been ‘mystery’ fabrics because I can’t read the labels – and the first time I was there I didn’t have a translation app on my phone. This big dotty fabric is a twill weave with a slightly brushed finish, and I reckon is a polyester-rayon blend of some kind. It didn’t press all that well, and tended to fray easily, but it has a nice drape.

I had muslined this pattern already in some dark blue crepe from The Sewing Basket (such a great place to buy sewing supplies!) and figured out how much length to take out of the legs – when there’s a cuff on the leg hem, it does need to be pretty accurate as altering the leg length isn’t as simple as just taking the hem up.

The triple-casing elastic was a new experience for me, but I rather like the result. My stitching lines weren’t perfectly even in the end and the elastic has a tendency to twist in one section (this can happen if the casing is too big) but they are pretty dang comfy, and they sit nicely on my waist.

All things considered, these were definitely a successful make, and I’ll be making them again!

So I’m still on this jumpsuit-making binge!

This time I’m using a fabric from my Japan haul circa 2016 and a Burdastyle Magazine pattern.

It’s a lightweight woven with a teeny bit of stretch – as usual with my Japanese fabrics it’s a bit of a mystery. I suspect it’s a poplin with a smidge of elastane. It’s a whacky floral-with-plaid that I originally thought I might use for a pair of proper pyjamas, but honestly I have made so many pairs of pyjamas that I didn’t really want or need another pair! So when I realised I would have enough to make this jumpsuit I knew it would be a great choice for spring and autumn.

The pattern is Jumpsuit # 111 from Burda Mag 09/2020. I traced a mix of sizes – it’s taken me a few years but I think I’ve finally figured out the best ways to grade between sizes on Burda mag patterns for my size and shape.

I did make several adjustments as I went along:

  • slightly longer leg length – the pattern is a 7/8 length on the super-tall model, so I only needed another couple of inches to make them full-length on me;
  • shorter sleeves (this is a winter pattern but this is a summer-weight fabric, plus I didn’t like the longer sleeve on me);
  • scooped the neckline lower at the front (boat-neck styles do NOT work on me) and of course re-drafted the neckline facing to suit; and,
  • increased the length of the back opening (more on this later)

When I am sewing up a garment, I normally have a think, before I start sewing anything, about what seams will be pressed open and what seams will be finished together. This is so I can sit at the overlocker and production-line as many seam finishes as I can. For example, I worked out that the inner and outer leg seams would be pressed open, as would the crotch seam; but the waist would probably end up being pressed together. Therefore, I could serge along the inner, outer and crotch seams of each leg piece before I start sewing – it’s SOOOO much easier to finish seams when the pieces are flat and not connected to each other. This has been my habit for many years, even before I had a serger and would just be zig-zagging away on the regular machine.

Why does it matter, you ask? Wether the seam is pressed open or finished together? Why not just finish ALL the edges and move on?

Well, it’s not a huge deal, but it saves bulk. If you have finished your seams individually on, for example, the neckline and the corresponding facing edge, there’s more bulk in that seam than if you finished them together – when you go to press the neckline, it’s not going to sit as nice and flat because of that little bit of extra bulk. Also, if you are a fan of grading your seams , you’ll have wasted a bunch of time (and thread) finishing an edge you’re going to then slice off.

Not mention the obsession I have at the moment with contrast seam finishes! I’ve got a pile of fun coloured serger thread cones (some new, some from fabric swaps or purchased secondhand) and I decided that life is too short for boring seam finishes. Unless the fabric is lightweight or see-through, a contrast or rainbow edge is a fun secret detail for you to enjoy every time you wear your garment!

Okay, back to the jumpsuit! Above, I mentioned that I changed the neckline and back opening. This happened during the first ‘fitting’ when I noticed how high the front neckline was, and how difficult it was going to be to get in and out of the damn thing – I ripped stitches in the CB seam the first time I tried it on. So, I folded the front at the centre and used a curved ruler to draw in a new, lower neckline, and then traced that onto paper to re-draft the facing. Then I opened up that CB seam a bit further – probably about two-thirds of the way down to the waist. I used a poppa stud and overlapped the top corners to fasten the back neck – most patterns have a little too much room in the back neck for me, and this was no different, so doing a little overlap there nicely fixed that.

Folks, I love this one almost as much as my romper! I got several compliments the first time I wore it. I’ve decided though that I like the look of wearing it with a belt, and I’ll need to go back and add some belt loops because not only does the belt slide around, there’s the issue of taking the whole thing off to go to the loo….. #jumpsuitproblems

It was over two years ago now that I was in England for the wedding of one of my best friends. Of course, when you go to England all the way from Australia, you do make an effort to pack in as much tourism as possible, and tourism for me includes fabric stores, because fabric makes a great souvenier!

I did hit Goldhawk Road on this trip where I bought two pieces of fabric (both made up now, yay, but not blogged yet, d’oh!). But I also did squeeze in a trip to one of the Sew Over It stores where I couldn’t leave without this fabulous dark green leopard crepe. I knew immeadiately it would be perfect for a pair of Burnside Bibs, so I had to quickly google the pattern while I was in the store to find out the yardage I would need!

I mean, it’s only taken me 2 years to make them, but I reckon they were worth the wait! This crepe is soft while still having a really nice heavy drape and it’s pretty comfy to wear.

The first pair of Burnside Bibs I made (which of course I have not blogged) were Version Two (waist ties only and no side zip), in a plain black woven rayon. I made the straight bib and I decided at that time to make them 3/4 length – I must have seen the Culottes craze on the horizon at the time. I adore them and wear them all the time.

So this time I decided to do the side zip and the bib with the scooped neck. I had an invisible zip in my stash, and I’d already purchased matching thread, so I didn’t have head out to the fabric store for any supplies for this make (it’s always dangerous to go to the fabric store ‘just for thread’, am I right?)

I decided to use a little contrast fabric to line the bib, I had some salvaged silk fabric in the stash which contrasted really nicely. I also added a secret pocket inside the bib – I had toyed with the idea of pattern placement to put one on the front, but in the end decided against it. I actually had enough fabric left over to make something small, like a camisole, but if I’d fussy-cut that pocket it would have been right in the middle of the largest piece. I’m working on reducing waste in the sewing room, so being able to utilise the leftover fabric was important to me.

I don’t know why I chose the turning option for the straps – honestly that must have taken me about four episodes of Schitt’s Creek to get them turned through!! Next time I’m doing the fold & sew option!!

I got a bit over-enthusiatic when I was reducing the leg length on the pattern though. The first pair I made were so ridiculously long, but I over-compensated on this version and they were about an inch too short for what I wanted. I used up some long strips of offcut scraps (yay!) to put a sort of binding at the lower edge instead of a hem, which did the trick! You can just see those bottom hems in the picture above.

Speaking of pattern placement, it did take me a while to realise the pattern wasn’t directional! Every second leopard is actually upside-down, which is great for fabric utilisation! Which is how I managed to have so much leftover fabric. I did manage to centre a leopard on the front of the bib though, and the leg-leopards are lined up horizontally too, so I was pleased with that. Some of my previous attempts at pattern matching have not been terribly successful!

The fabric was lovely to work with – as I said it was heavy but soft with a lovely drape, so I was worried it would be a slippery nightmare, but it was really stable and well-behaved.

Concentrating very hard in this pic…..

However, it appears that my obsession with one-piece outfits (like my recent romper) is not over! I’ve since made another romper, and a jumpsuit, so stay tuned for a post about those! Have you jumped on the jumpsuit bandwagon? What’s your favourite one-piece style, or what patterns have you tried?

Umm, yeah, so I made a romper.

It’s not what I was expecting to make at my age, but sometimes when the mood hits, you just gotta go with it.

But come on. Jumpsuits, overalls, boiler suits, onesies, rompers, playsuits – one piece outfits are so on trend right now! And I have made overalls before and LOVED them, so I figured what the hell. They look comfy, and I’m all about comfort!

Circa 1984.

I’d picked up this cute vintage pattern from a trip to the Acheive Sewing Basket, earlier in the year when it was normal to travel and my mum was visiting from interstate. The paper pattern was already cut to a size that was way too small for me, so I decided to brush up my skills and grade the pattern up. I worked out all the ease amounts, took my measurements, and used the slash-and-spread method to redraft the pattern pieces. Not counting the pockets, which didn’t require grading, there were only four pieces I had to work on: bodice front and back, and pants back and front. I also added a couple of inches of length to the shorts as I like a longer short length. (Did I just use the phrase ‘longer short length’? Good grief. )

Whoops. Forgot to take photos of the drafting process. Sorry! Dunno about you but it often happens when I’m really into the task at hand.

I’d already decided I wanted to use this lovely heavy piece of tencel rayon. I’m not 100% certain but I’m pretty sure I picked it up at a fabric swap. There was only 1.2m and the pattern called for 2.2m! So I had my work cut out for me (see what I did there?)

By skipping the facings, using different fabric for the pockets, piecing the pants back, and squidging the grainlines a tiny bit, I managed to squeeze my main pieces onto my 1.2m!! There was bugger-all fabric left over, which makes me really happy from a sustainability point of view. I even managed to use up that little rectangle in the middle, on the shoulder facings.

This fabric had some marks on it, I’m not sure if they were from an unsuccessful dye bath or storage or whatever, but I kind of liked the way it looked. Sort of like a worn-denim look. Not terribly obvious on the finished garment, in my opinion, but I intended these as a wear-at-home summer outfit anyway, so they won’t go out in public much.

I had some scraps of tencel denim in the stash, the perfect weight to match this fabric – love it when scraps get used up! I also had several yards of home-made bias binding, no idea what I had made it for but it got pressed (haha!) into service in place of facings to finish the sleeves and neckline. I did use a couple of strips of iron-on interfacing and a small piece of fabric as a facing just at the shoulder points, to stabilise the buttons and buttonholes.

Buttons were also from my stash. Sewing on buttons might be a drag, but digging through the button box is always great fun! Pulling out possibilites to lay against the fabric, scratching around the loose buttons at the bottom to see how many matching ones I can scrounge up – what a treat. These gold-and-blue ones were salvaged off a refashion at some point in the past, and I never thought I’d use them – they looked pretty tacky on the original garment. But set against the dusky blue of this fabric, the colour was perfect and the gold just gave it a lovely pop!

It’s still chilly here at the moment, but we’ve had a couple of lovely warm spring days and this romper was the BUSINESS for lazing around on the balcony in my new (secondhand) hammock with a book and some snacks!

Ah, no – I didn’t take any photos of me in the hammock! I’m way too lazy to get that organised.

Oh, and this pattern is from 1984, and I actually finished it in September. Which means it qualified for the #sewvintageseptember challenge! I rarely manage to finish something in time for a challenge!

I’m dead keen now to try some more overall/jumpsuit patterns. I’ve got the Seamwork Lucy all ready to tape together so that’s probably the next one on the list! There’s some knit fabrics in the stash just crying out to get used!

Speaking of overalls, I’ve got another pair of Burside Bibs on the list too, so stay tuned because the fabric I have picked for that is soooo lovely.  Do you love a one-piece garment? What patterns have you tried?

So it has been quite a while since I posted anything even remotely close to a ‘here’s what I made’ post. I’ve been sewing up a storm during the COVID lockdown, but haven’t made the effort to take any decent pictures of my creations. So here’s one that I’m really quite proud of.

This is the Elevation Hoodie pattern from New Horizons designs. I’ve made this once before, and the tricky triangle seams were defintitely easier the second time around. I made the sweater version, no hood, and without pockets.

The floral loop-back knit was from one of my trips to Japan, so this fabric has been in my stash since 2018. I only bought 1m of this, so I’d been waiting for inspiration that would allow me to make the most of the limited amount of fabric. When I was packing up my sewing room (I moved house during COVID, too!) I realised that this rust-coloured jersey somehow went perfectly with the floral print. It’s actually a piece of rayon jersey left over from doing a refashion for my flatmate (dress to t-shirt, so I had a nice long rectangle of fabric to play with.)

Once I worked out that the Elevation sweater’s diagonal pattern piecing would fit perfectly on the floral terry, I was in business! It did involve some thoughtful pattern placement (AKA Pattern Tetris), but that’s actually a challenge I really enjoy.

Meh, I was not paying attention to the lighting when I took this shot, was I?

The rayon jersey was quite a bit softer and stretchier than the terry knit. I was worried about it stretching out when I joined it to the more stable floral, so I interlined it with some white cotton knit from the stash. This worked a treat, and I think it also helped with the tricky triangles too.

I had run out of KATM labels! But I had this cute measuring-tape print petersham ribbon in my stash, so I’ve been using strips of that to identify the backs of my homemade garments. It takes the guesswork out of getting dressed in the morning, amiright?

I used a small zig-zag stitch on the diagonal seams, before finishing with the overlocker (serger). It would have been quite difficult to manipulate those tricky angles through the overlocker! The rest of the seams were done on the serger, and then at the end I used the coverstitch to make that finishing topstitch on the neckline.

I’m pretty proud of my seamline matching at the armscye, too! Not always easy when working with knits!

I made this towards the end of the cold season, but I did get to wear it a few times already. Because the loopback terry was quite stable and not too stretchy, it ended up being a slimmer fit than the first version I made in a fleecy spandex. So it’s most comfortable just worn on its own as a long-sleeve top, as it’s a bit too tight to layer over another top.

(Oooh, I’m actually wearing me-made jeans in this photo too! I may have blogged about them over here. )

Well, I’m gradually wearing down the Japan fabric haul! I recently made a little bag out of one piece from the 2017 haul, which I hope to write a post about as it turned out super cute.

And that’s all for this post! I have several more finished garments I hope to blog about, so I’d love it if you swung by every now and then 🙂

Easy Bike Seat Cover Tutorial

Oh dear – my poor bike seat has seen better days! The silicon padding is still good, but the lycra cover has ripped beyond help.

So when I dropped off my bike for a well-deserved service, I kept the seat with me and whipped up a funky seat cover to cover up the rip. The result was so nifty I thought I would share it with you in a quick tutorial. It’s also a great way to use up some scraps of stretchy fabric!

MATERIALS NEEDED
– Fabric with 4-way stretch such as performance lycra, spandex or supplex
– Elastic (or ribbon or cord)
– Pattern paper (you can really use any kind of paper!) & pencil
– Scissors, pins, thread, and a ballpoint or jersey needle for your sewing machine.

NOTES
The pattern you are about to draft will include a 1cm seam allowance.
Use a small, narrow zig-zag stitch to sew this item.

STEP ONE – DRAFT THE PATTERN
If you don’t want to draft a pattern yourself, I’ve included a download of the template piece I drafted for my bike seat, which was 28cm long and about 16cm wide.
To draft the seat pattern, place the seat upside-down on some tracing paper.

Firstly mark the centre of the top and bottom points of the seat. Start drawing around the seat at the bottom and top, but don’t go all the way around yet.


Roll the seat to one side (I’m right handed, so I used my left hand to roll the seat towards the right so I could draw with my right hand.) Continue to draw the rest of the way around the right-hand side of the seat. This captures the contours of the seat and ensures the pattern piece will have enough coverage.

Move the seat out of the way, and smooth the curves of your pattern (freehand or use a pattern drafting curve).

Add a 1cm seam allowance around the outside of the pattern.

You can do either of these options to complete your pattern:

1. Draw a line connecting your two centre points. This is now half of your pattern. Fold your pattern paper in half along the centre line, and trace through onto the other half of the paper. Open it up and voila – a perfect mirror image!

2. Draw a line connecting your two centre points. Now draw a second line, parallel to that centre line, and add some arrows. You’ve now got a ‘cut one on fold’ pattern!
Whichever option you chose, you can now cut out your paper pattern.


You’ll also need a casing pattern piece. Use a flexible tape measure to measure the circumference of the seamline of your pattern (not the outside edge). Cut a piece of pattern paper that length + 2cm, and 4cm wide. Mark the centre point of the pattern.
For example, the circumference of my bike seat pattern seamline was 85cm, so my casing pattern piece was 87cm x 4cm.
NOTE: You can make this seat cover without the casing piece, and just use the hem as an elastic casing, but you will get a better fit if you use a separate casing piece.
While you’re measuring the circumference of the seat pattern piece, grab your calculator and work out the quarter marks (ie. halfway between the two centre points) and mark those on your pattern as well.


STEP TWO – CUT YOUR FABRIC
Lay your pattern pieces out on your fabric. If you have enough fabric to work along the grainline, great. Which ever option you chose above, the centre line is the straight grain. However, if you are using up some scraps from your stash, it’s actually not going to be the end of the world if the pieces are off grain!
Cut out your pieces. Notch the top and bottom centre and quarter points of the seat piece, and the centre points of the casing piece.


STEP THREE – CONSTRUCTION
Take the casing piece and fold in half. Sew the two short ends together, but leave a 1cm gap in the centre – this is for threading your elastic through later.


Lay this piece out on your table so the seam and centre notch are lined up. The folds at each side are now the quarter points, so put a little notch at those two points as well.


Fold this piece in half longways. If you’re using a slippery fabric, you may want to baste the two long edges together, but you can skip that step if you wish.


Match the seam of the casing to the centre back point of the right side of the seat piece, raw edges together and pin in place. Match the other casing centre point to the front centre of the seat, pin, and then match and pin the quarter points together.
Because you’re sewing some funky curves, you may want more pins than this. It’s helpful to pin halfway between the quarter points as well.
Head over to your sewing machine and start sewing. Go slowly – you may need to stretch your casing piece a little as you sew, because you are sewing a straight edge to a curved edge, but be careful not to pull too much or it will go all wobbly.* If you have an overlocker, you could use it for this step for a nice clean finished look.


Grab a piece of elastic about 40-50cm long and use a safety pin (or an elastic threader) to pull the elastic through the casing.

Once you have it all way through, knot the two ends together. (I had one one of those little aglet-squeezer thingies I’d salvaged from an old tracksuit, so I thought it would be cute to use here!)

Place the cover over your bike seat and tighten the elastic until it is nice and snug, then knot the elastic again. You can trim the elastic now if you want. (You don’t need to use elastic – a piece of cord or ribbon would do the job just fine; you’ll need a piece 10-15cm longer than your casing to get all the way around with some length to work with at the ends.)

And that’s it! You have made a funky new cover for your bike seat. Well done!

TIme to hit the road!


Cross-posted from Sew Active Fabrics.


* A technical term for when the fabric stretches out and doesn’t recover. (Different from ‘wibbly-wobbly’, which is a technical term for when time itself stretches out and doesn’t recover.)

One of the best things about making your own clothes is having the option to personalise them. I’m not just talking about tailoring to fit, or hacking your pattern – I’m talking about those little things that make a garment perfect for YOU, the maker. Whether it’s sewing in a label on the inside or outside of your garment, moving or reshaping a pocket, adding topstitching, braid or ribbons, or putting a mini-ruffle on your neckline – all these little touches give our makes personality!

Some time ago I decided I did want to have a go at making my own jeans. With so many patterns available, tutorials galore and plenty of hardware in the fabric stores, it was really just a matter of time. When I was thinking about making jeans, one of the things on my mind was the back pocket design. There’s a lot of play available in the topstitching department. Needless to say, as a #nerdgirl I had stacks of ideas.

For my first pair of jeans – a toile, really – I wanted to go a slightly easier route and make a pull-on jean. I used the Itch To Stitch pattern ‘Mountain View Pull-On Jeans‘ as I liked the look of the wider waistband, and the centre back seaming gave them a bit of interest.

The fabric I used was from a fabric swap a while back. It’s a purple slub denim with about 10% stretch, and there was about 3m of it – enough for two toiles if I was frugal.

For once I actually slowed my sew and did some fitting throughout the process! One of my worst sewing habits is plowing through a make start to finish and not doing any fitting checks, only to find it’s impossibly wrong. This usually occurs just after I’ve finished 7km of topstitching. Not this time, friends.

I cut the jeans to the boot-leg pattern, but during the fit I adjusted to a skinny leg. I did get a bit carried away with the skinny-fying, as this fabric wasn’t as stretchy as other skinnies I wear, but I was able to let them out again. I completely messed up the front pocket application because I’d missed tracing one of the pocket pattern pieces, but I just went with my usual pocket application method, used some leftover stretch sateen for the pocket bag, and it worked out just fine.

Okay, so now to the point of this blog post:

Okay, so maybe I wanted to make jeans JUST SO I COULD DO THIS. (And I”m not talking about the gratuitous butt shot!)

Yes, I put the #StarTrek Logo on my jeans pocket.

I did reverse the logo on the right-hand side, because the human brain loves symmetry. Also, it’s in silver metallic thread, because when you have silver metallic thread in your stash, what else would you use it for but topstitching the Star Trek logo onto your jeans pockets??

The possibilities for pockets are endless. Klingon icons. Deceptacons or Autobots. The Hogwarts logo. Wonder Woman. The Summoning Dark. My biggest problem is that I don’t need that many pairs of jeans, so I have to pick only one or two!!

There are a few things that didn’t work that well on these jeans.

I didn’t make my usual short-rise adjustment, so they are too high in the waist.

Because I took a big chunk out of the centre back seam, there is a weird and unnattractive pull across the back yoke.

The super-wide waistband means the pockets must be set quite low, in order to have a pleasing gap between the pocket top and yoke seam… but this puts the pocket almost under my butt.

However, these are all minor points, and overall I’m extremely happy with these jeans. For a wearable toile, they’ve already been worn twice, and I’ve even ridden my bike in them! (Test driving against a future pair of cycling jeans!)

Are making, or planning to make, your own jeans? Got plans for the back pocket embroidery? How else do you like to customise your me-made clothing? I’d love to hear about any jeans pocket topstitching design ideas!

So I bought a pair of jeans.

Not that I’m not keen to try making jeans (I have the Ash Jeans pattern and some lovely denim I bought in Japan) but I actually wanted jeans in technical denim for a month-long overseas trip.

I bought a pair of Vigilante’s amazing Scion Jeans. I already have one pair of Vigilante jeans purchased several years ago (which still look brand new!) so I knew I would be getting great quality. Why am I purchasing something I already have, you ask? Well, my old Vigilante’s are a wide leg jean which are super comfortable but I wanted a skinny pair. I went down a size as I knew they would be super-stretchy, and I was right.

They fit great in the hip, thigh, bum and crotch, but the waistband is toooooo stretchy. It’s not interfaced or reinforced in any way either, so while my legs were loving the skinny fit, the waist would be creeping downward, leading to inevitable, constant ‘waistband tug’ practiced by skinny jeans wearers worldwide.

Which is where my alternative jeans-waist-adjustment comes into play!

I have previously done some looking around the interwebs and there were a few tutorials for taking in the back waist seam, most of which involved a lot of unpicking of the waistband and centre back seam (which is usually a flat-felled seam, or the topstitched faux-flat-felled seam) followed by fitting and marking and pinning and re-sewing…. and they all seemed to gloss over how to deal with getting that original flat-fell seam to sit nicely in line with the new seam – in my mind’s eye, that looked difficult and time-consuming. And lumpy.

But I’ve got a different method. Minimal unpicking, only a little sewing, and an almost-invisible alteration!

Supplies:

  • Sewing Machine
  • Thread to match your jeans
  • Topstitch thread (optional)
  • Jeans needle (if your jeans aren’t too heavy, you can just use a Universal needle in a heavier weight like a size 14)
  • Elastic (The width of your elastic will depend on the width of your waistband – it needs to fit between the topstitching on the waistband. I had some 2.5cm elastic that was perfect for this. The colour of the elastic doesn’t matter, either – you won’t be able to see it when you’re done!)
  • Stitch ripper/unpicker
  • Sharp scissors
  • Chalk
  • Measuring tape
  • 2 safety pins

To start with, put your jeans on. Have a look at where the most bagginess is happening in the waistband. In the case of my jeans, it’s pretty much all the way around. You might decide you only need to adjust a little at the back waist, or just from the side seams. (Folks, it’s reeeeally hard to take photos of black jeans while holding your waistband with one hand….!) I had already unpicked one of my belt loops when I realised I needed more ‘before’ photos – that’s why it’s sticking out in this photo!

Have a look at where your belt loops are. You’ll be running your elastic from one belt loop position to another, so you can hide the elastic insertion points under the belt loops. Pick which belt loops you are going to use, then unpick the stitches holding the TOP of the belt loop to the waistband. You don’t need to unpick the bottom of the belt loop. As you can see, I’m using the two belt loops at the front.

In the case of my jeans, I also needed to unpick the vertical stitches holding the belt-label on, as it was sewn through the waistband. If your jeans don’t have a belt label, you won’t need to do this.

Take a tape measure and measure the distance between the two belt loop positions. Cut your elastic to this length.

You may need feline approval.

Take your chalk and mark a vertical line on the inside of the waistband directly under the positions of the two belt loops you just unpicked.

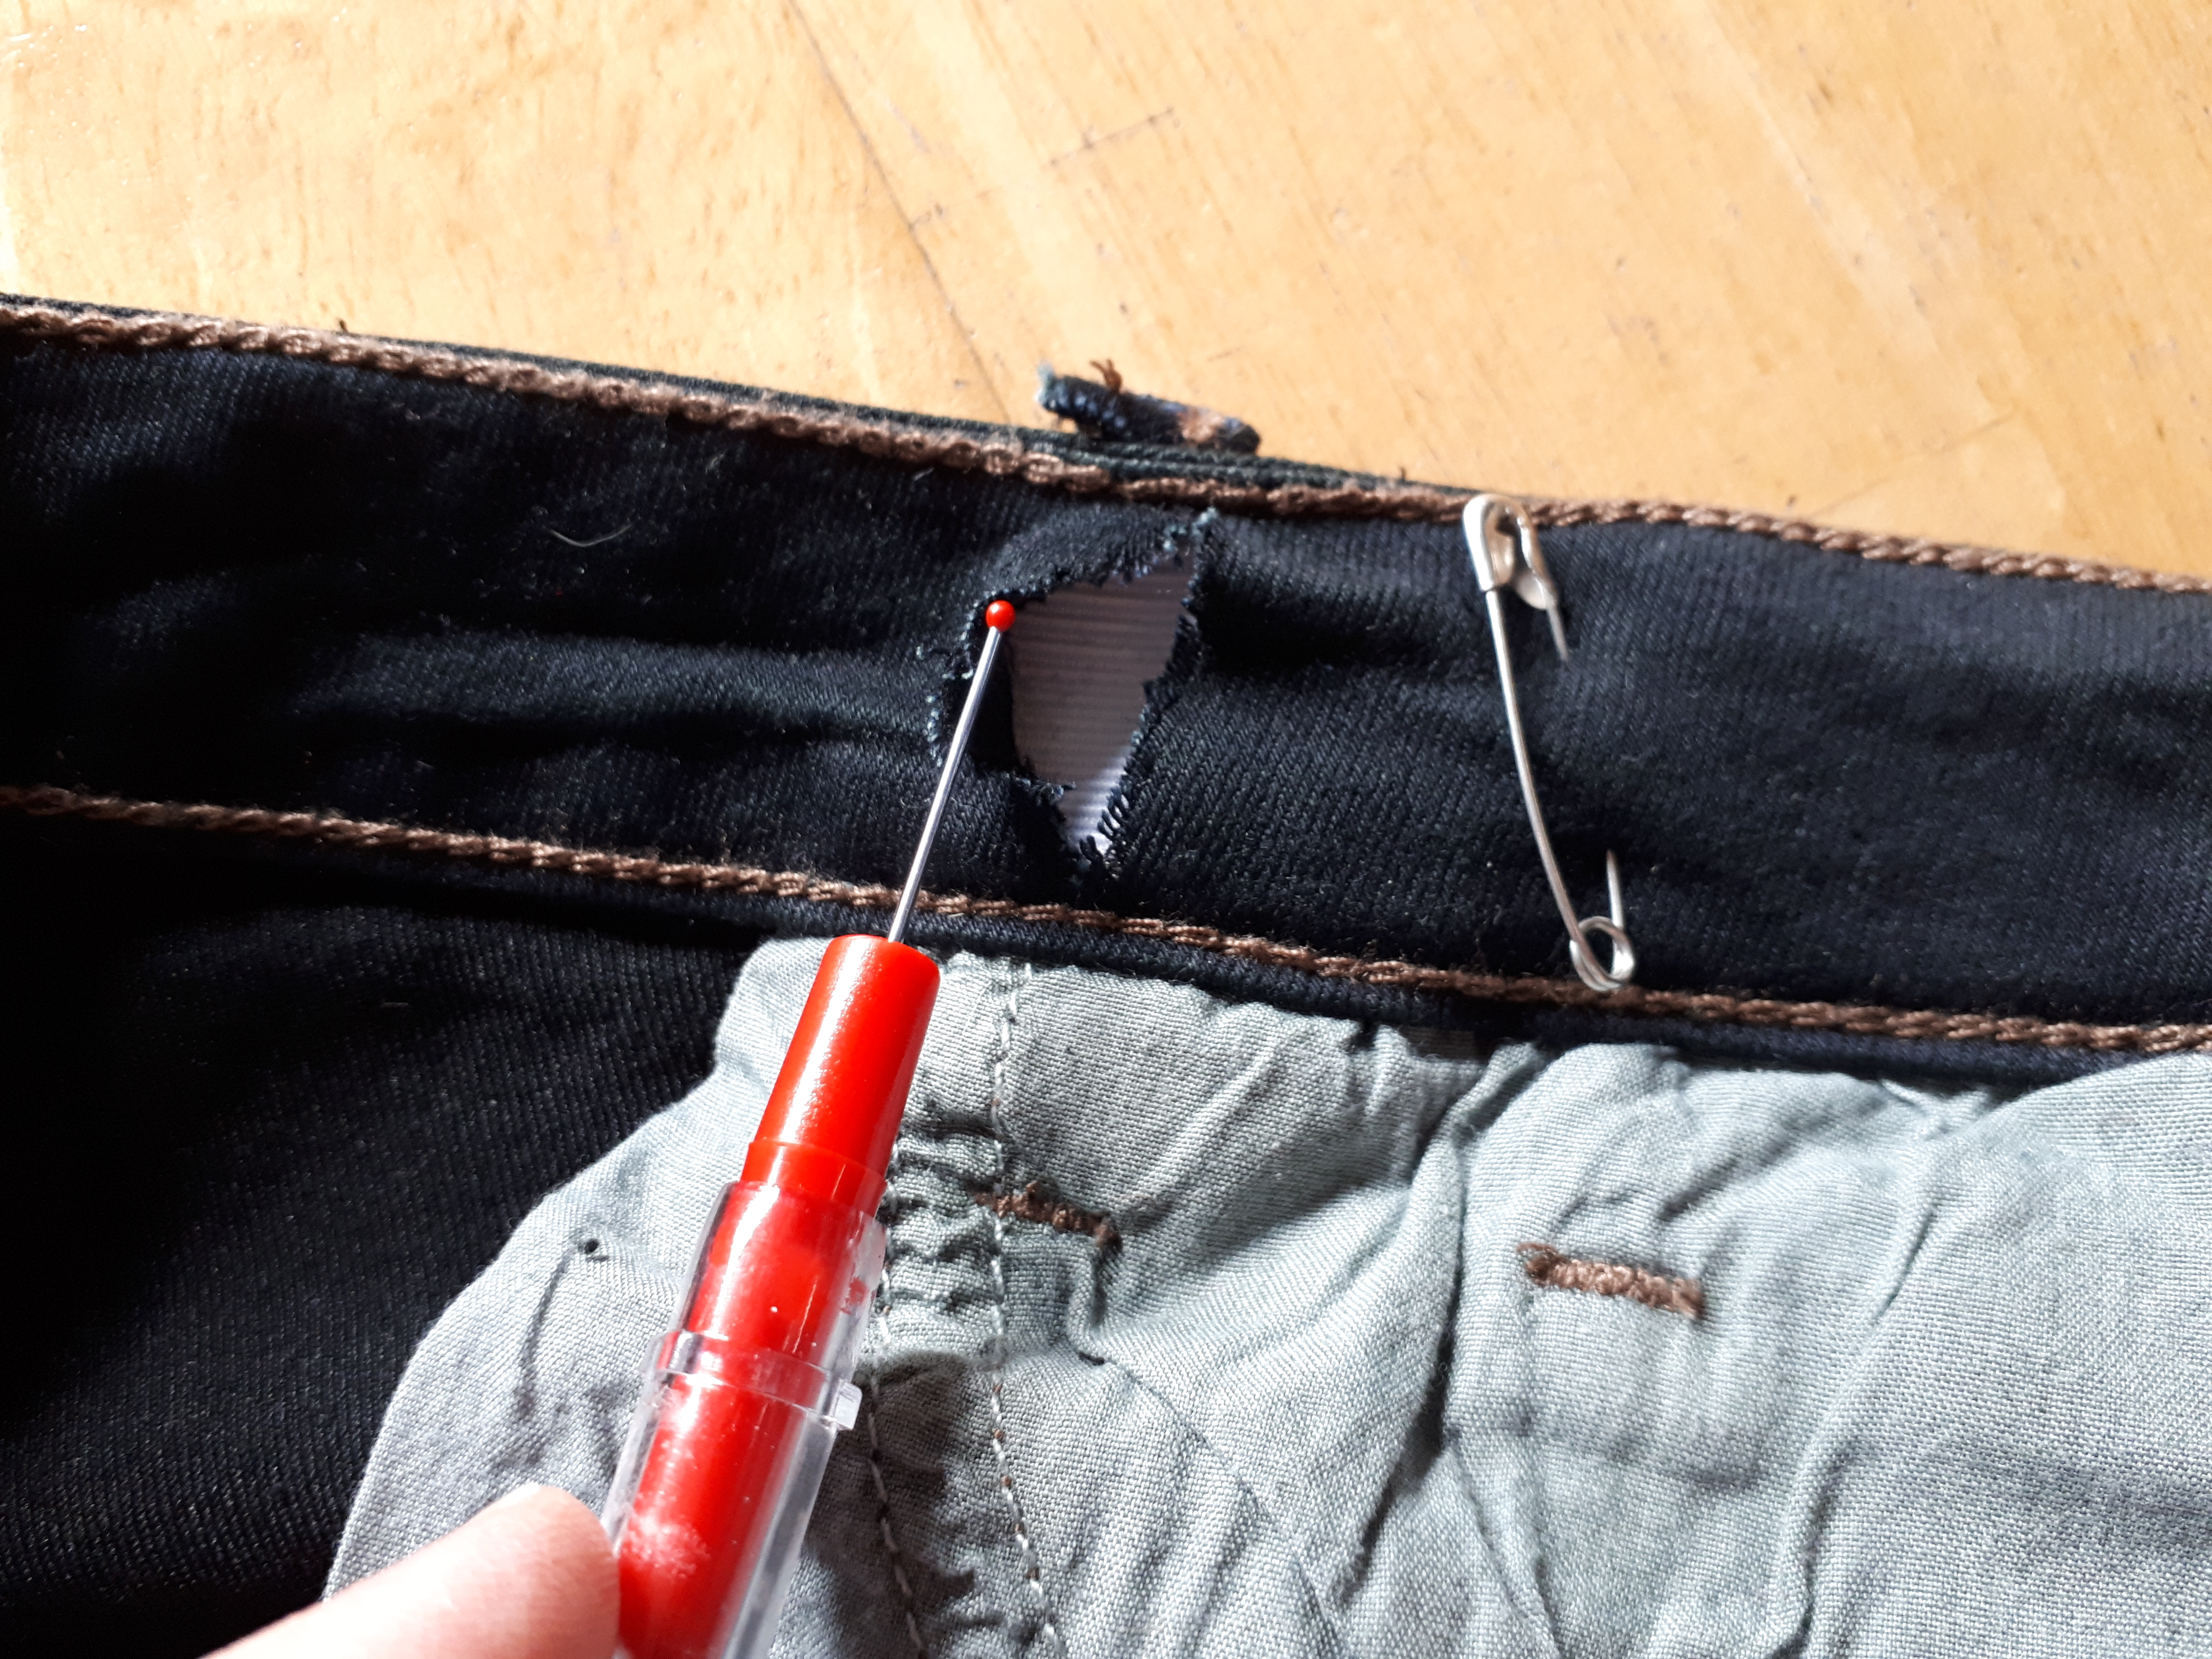
This is the slightly scary part. Using small sharp scissors (or your stitch ripper, if you’re feeling brave) carefully cut along that vertical line, being careful not to cut the topstitching at the top and bottom of the waistband. You are only cutting the fabric on the inside of the waistband – don’t cut all the way through to the outside of the jeans. Repeat for the other mark you made.

If you are worried about fraying, you could add some FrayStoppa at this point to those cut edges, but I didn’t bother.

Attach a safety pin to each end of your elastic piece. Insert one end of the elastic into one of the slits you have just made, and use the safety pin to carefully feed it aaaaalll the way along to the other opening.

Keep an eye on the loose end, and when it gets near the opening, use the safety pin on that end to secure it to the waistband just near the slit.

Your elastic should now be all the way through the waistband, and you should have an end poking out of each slit.

Remove your safety pin from the loose end of the elastic, and carefully wiggle the end of the elastic back into the waistband so it extends past the slit by at least a centimetre, and is inside the waistband. You can use your safety pin again here to secure it, or a regular sewing pin if that’s your jam.

Set up your sewing machine with a heavy-duty or jeans needle and thread that’s as close a match to your jeans as possible. You want a wide, tight zigzag stitch – do a couple of tests on some scrap fabric if you need to. It will look kind of like a buttonhole stitch, but much wider.

Position your jeans waistband under your machine needle so that the slit will be covered by the width of the zig-zag stitch. I went over the stitching a couple of times, using the reverse stitch on my machine to go backward, to get a really solid connection, and I also offset a couple of the lines of stitching to make sure all the raw edges were covered.

You can take out that first safety pin now, and try on your jeans again. It might help to try them on inside-out at this point. The loose end of the elastic should still be pinned, so you’ll need to un-pin it, but be careful not to let it slip back into the waistband! Pull that loose end through until you get the fit you want. Secure it again with your safety pin.

You might need to trim the end off, or it might be perfect as is. Tuck the end of the elastic into the waistband, and repeat as above to secure this end of the elastic in place.

Now all that remains is to stitch the tops of the belt loops back in place – use your topstitching thread here if you want. You may need to adjust your machine tension if you do use a thicker thread in the needle.

And you are done! Get yourself into your sweet fitting jeans and paaaaar-taaay!

Just so you know this wasn’t a fluke, I have used this method previously on a pair of cargo-style pants with equally successful results. For this pair I used the belt loops on each side, so most of the elastic gathering happens in the back of the pants.

Both of these pairs of trousers did the month-long trip with me (in fact they were the only long pants I took, except for a pair of active leggings) and both were super-comfortable and robust. No waistband-hitching occurred! I also did a wardrobe cleanup and ditched three other pairs of black jeans that didn’t fit as well as my newly-fitted Scions, so I’m winning all over the place!

I hope you enjoyed this tutorial or found it useful! I haven’t done a tutorial since forever so I’d love to hear from you – please leave a comment below!