This year I concentrated my fabric shopping obsession (and yes, I think I really do have a problem!!) in Osaka, so I’ve written this post to help any other travellers wanting to have a sticky beak at the lovely shops in that city!

If you want to have a look at my ridiculous haul from this trip, I wrote about it here.

A couple of things to note about shopping in Japan: most shops don’t open until 10am, but many will stay open until 7 or 8pm, depending on their location. Some shops that are multi-level will require you to make your purchases on each floor, but others let you wander from floor to floor with a basket of goodies. Tax in Japan is 8% – this is usually not included on the ticket price, so remember to factor that in when you are working out the prices.

If you are shopping in Tokyo, obviously Nippori Fabric Town is the place to go – a whole street of fabric shops! I didn’t go there this year as I was spending my spare days in Osaka. However, the days I was in Tokyo for the karate seminar, I was staying in Kamata, and there is a Yuzawaya store about 200m from my hotel! So of course I paid it a quick visit!

Yuzawaya

Yuzawaya in Kamata is a massive store – with three shopfronts, two of these have 5 floors and the other has 3. Covering all aspects of craft, from sewing to knitting to papercraft to flowerwork and everything in between! If you can only get to one store in Tokyo, this is a good one!

To get there, take the Yamanote line (green) to Shinagawa and change to the Keihin-Tohoku line (blue) towards Kamata. In only three stops you’ll be in Kamata.

When you come out of the ticket gates, turn right and head out of the station via the stairs or escalators (if you go past Starbucks you’re heading the wrong way!)

You’ll come out into a pretty plaza area with a couple of shopping arcades on the other side. Turn left and walk down the covered street, past the Tokyu Store and in about 50m you’ll come to the first of the Yuzawaya shopfronts on your left!

After Tokyo I headed down to Osaka on the bullet train (yes, I did Bento on the bullet train – such fun!) I had three shops to visit there, and found another couple on the way as well.

Toraya

Once I got to Osaka, the first place I visited was Toraya – again this one was very handy to my hotel. Thanks to the excellent directions from Betty Stitchup in her blog post I found it first try. If you are doing the Shinsaibashi Shopping Street, just keep walking south and it will become the Ebisubashi Shopping Street. Toraya is near the Namba end of Ebisubashi, sort of diagonally opposite McDonalds. There are a confusing number of exits from Namba Station, and you can even end up in a different underground section called Namba walk. Look for an exit that takes you to Midosuji, that is the major street that runs parallel to Ebisubashi.

Toraya is three floors of fabric fun with a small haberdashery section in the top floor. It uses a truly fascinating purchase system. Once you have decided which fabrics you want (this could take a while!), get the attention of a shop assistant (they all wear a little tool belt). They will cut two little samples of your fabrics and staple them to a reciept with the fabric code number and the amount you want. You get one copy of the reciept and the other goes in a pneumatic tube to the top floor. Ten minutes later you rock up to the cashier on the ground floor and present your receipts and your fabric will be there waiting!

Pneumatic Tube System!

The fabric range is good, less crafty prints than Yuzawaya and more dress fabrics. Lots of plain wovens in a great range of colours, textures and content types, and the upper floor of more fancy evening fabrics was lovely. There is also a remnant shelf on that floor – I did have to restrain myself!!

Although many shops in Japan are cash-only, Toraya will take both Visa and Mastercard (I didn’t try AMEX so I’m not sure). The store is open 10am to 7.50pm.


Also, if you are looking for somewhere to eat, from Toraya go west down the side street and across Midosuji – there are a bunch of restaurants in the side streets around here that look fantastic!

Otsukaya

A very similar store in content to Yuzawaya, Otsukaya is a beautiful shop with five floors of stunning fabric and haberdashery.

Again I was able to find this easily via Betty Stitchup’s blog, although the walkway she mentions was partially closed for renovations and I went a slightly different way.

From Shinsaibashi Station, take the Midosuji line to Esaka. Head towards exit 4 & 5, and you can go straight ahead into the building there. There’s a bookshop dead ahead and coffeeshop on the ground floor if you need refreshment! Walk downstairs and take that exit near the coffeeshop, then turn right into the walkway. Turn left onto the street, cross over – watch out for bicycles! – and walk on towards the big Pachinko parlour, then right down that street. Walk about 2 blocks and Otsukaya is on the left hand side, opposite the waffle rocket (you’ll see what I mean).

Ground floor is wovens, loads of crafty cotton prints in various weights, plus plain drill and a great range of denims too. Second floor has patterns, stretch fabrics and more fancy wovens, including some nice-looking athletic fabrics.

Third floor has haberdashery, and masses of beautiful kimono crepe and cotton, and more evening fabrics. There’s a Marimekko corner too! As well as what looked like a tailoring or class area.

Fourth floor is furnishings and more haby (bag making supplies!) and patterns.

Unfortunately I forgot to take a picture of the 5th floor sign and I can’t remember specifically what that floor contained – it was certainly more fabric, and I think it was suitings and high-end textiles.

Otsukaya is closed on Wednesdays, but open 10am to 6.30pm for the rest of the week. I paid with VISA and with cash, but I beleive they accept Mastercard as well.

Prices were very reasonable, especially on the denim and the bagmaking hardware!

Nippon Chuko

I discovered this place via Yelp but found my own way there – getting a tad lost on the way! Nippon Chuko is an online wholesaler, but the Osaka store is open for retail. I beleive they also ship international from the online store.

On the Midosuji line, take the subway north and get off at Hommachi Station. You can walk from here, or you can go one stop east on the Sakaisuji line to Sakaisuji Hommachi station. From Sakiasuji Hommachi station, take exit 7 and turn immediately left at the top of the stairs. Walk along towards the big green Fanbi Town sign. When you get to the intersection with McDonalds above Kohyo, turn left and Nippon Chuko is a few doors down on the left.

There are lockers at the front of the store where you can stash your bag while you shop (don’t forget to take your wallet with you into the store) for a returnable 100Y coin. A blessing if you’ve been humping your backpack or a heavy handbag around all day!

This place is less about fabric and more about craft – but again, 4 floors!! There is SO MUCH HARDWARE here – if you are into bagmaking at all this is the place to go. I have never seen so many handles, straps, brass, leather, snaps and clasps in one place!

There is also an extensive range of threads and zips – and I mean extensive!!

There are some basic woven poplins & cottons on the second floor, and a lovely assortment of heavy kimono cottons on the top floor, as well as some quilting cottons.

You can grab a basket and shop all the levels, and bring your goods to the cashier on the ground floor for a single purchase. There are cutting tables on the fabric floors where the staff will cut & bag your fabric for you to take to the register. I used a VISA card here with no problems.

Nippon Chuko is open 9am to 5pm, closed on Sundays.


Torii

In between Nippon Chuko and the intersection, there is a shop called Torii. Reminiscent of the consignment fabric stores right here in Sydney, this place had a two-metre minimum purchase. I arrived there only 15minutes before closing so only had a breif glance around; there seemed to be plenty on offer, heavy on the upholstery & decorating fabrics.


Embroidery & Ribbon Shop

Also in between Nippon Chuko and the intersection is a lovely little shop specialising in ribbons and embroidery. Again I only had a few minutes for a quick glance around but they had an amazing range of ribbon and a second floor that I didn’t even get to.

Random Designer Fabric Store

Across the road from Torii, I spotted a shop with literally MOUNDS of fabric piled up at the entrance. I popped over and discovered more mountains of textiles piled up in there! I’ve really no idea if this was some kind of consignment store – I don’t have enough Japanese language skills to really ask the staff.

However, after a quick poke around, I realised that most of the fabrics were high-end designer pieces – I’m guessing end-of-roll stuff. I saw a gorgeous embroidered silk velvet that was Y64,800! (Although maybe that piece was a sample, and the price was per roll?? I’ve no clue!)


Atelier for Nani Iro (& craft beer!)

The Atelier for Nani Iro is a small studio with a range of Nani Iro fabrics available to purchase, and a rack of beautiful sample garments to browse. No photographs allowed in this beautiful, light-filled studio, although I did convince the staff to allow me to take a a picture of the label, from the fabric I bought.

I found the shop easily, with the excellent pictorial instructions provided by Japanese Sewing Books.

Take the Midosujui subway line (I was taking it from Namba station) and disembark at Higobashi station. Take exit 7, and walk straight ahead towards the blue Aoki sign. Walk a couple of blocks, until you see a Yoshinoya on the next block – turn left before that. You’ll go another couple of small blocks, passing a car park on your left, and then you will reach a park on the right hand side. Nani Iro is directly opposite the park, on the second floor of the bulding with the gold lettering.

And if you (or your travel partner) needs refreshment after (or during) your shopping, there was a tiny craft beer garden only a couple of doors away from Nani Iro – I didn’t drop in but it looked totally sweet!

Handy Shopping Phrases

Here’s a couple of very basic phrases to help you shop for fabric in Japan!*

I-ku-ra des ka? (How much is it?)

Ko-re wa o ku-da-sai. (This one please.)

Ichi metre o ku-da-sai. (One metre please!)

Ichi metre goju o ku-da-sai. (One metre fifty please!)

Ni metre o ku-da-sai. (Two metres please!)

Credit-o card-o deska? (Credit card okay?)

Su-mi-ma-sen, ….. doko des ka? (Excuse me, where are the ……?)

Toy-ret-u wa doko des ka? (Where are the toilets?)

Ko-re wa ko-tsu-ton des ka? (Is this cotton?)

Ari-ga-to go-zai-masu! (Thank you!)

(*Disclaimer: Please note, I DON’T speak Japanese, so I’m not promising the above phrases are grammatically correct – but that’s all I needed to do my shopping, so you could find it helpful. And if all you can remember is please and thank you, that still counts for a lot in super-polite Japan.)

And if you have limited time in Tokyo and can’t devote several hours to Nippori Fabric Town, I recommend Tokyu Hands. There is one near Shinjuku Station which is surrounded by shopping malls. Tokyu Hands has a craft and homewares section which is fun to browse, even if you don’t buy! (There is also one in Kyoto, not far from (on the same street as, in fact) Nomura Tailor.)

I hope this post is helpful to anyone headed to Japan who might be interested in a side trip to one (or more) of these shops. Great places to get some sewing souveniers!

I’d love to hear about any other Japanese sewing adventures – please leave a comment below!


It’s that time of year again – my psuedo-annual trip to Japan for a karate seminar, with a generous helping of fabric shops along the way!
Cherry Blossoms in Tokyo.

My trip started with a single night in a capsule hotel in Shinjuku, Tokyo. If you haven’t tried a capsule hotel they are excellent value for a single night, and a fun experience (in my opinion, anyway!) Japanese hotels are scrupulously clean and this one was no exception.

I was up early the next morning and on the bullet train to Nikko where there are several beautiful temples and shrines in and around the town of Nikko. I’m going to gush about the ryokan I stayed at there – I wish I’d had more than one night! It was a sweet little Japanese-style inn called the Turtle Inn. (The Discworld approves!) My room was furnished with a futon and low table and a washbasin with running water. The fact that the bathrooms were shared was entirely made up for by the fact that both single bathrooms had onsen – ie, a private hot tub!! After a long day travelling and looking around temples, a long hot soak was just what the doctor ordered.

After two days wandering around shrines, temples and underground caverns, it was time to head back to Tokyo and my hotel in Kamata. By happy accident, the hotel I stay at for the seminar is only a few hundred metres away from a big fabric store, Yuzawaya – so that was my first stop!

Yuzawaya (Kamata, Tokyo)

The first time I visited this store – my first visit to Kamata, two years ago – I didn’t have time to really appreciate the size of the store or the volume of products available. This time I made sure I had time for a really good wander, even though I wasn’t intending to buy too many things (I needed to keep plenty of room in my suitcase for shopping in Osaka!)

With three shop fronts and several floors to each shopfront, there’s plenty to look at in Yuzawaya! I was very disctracted by the fabulous range of denims right at the front of the store – and I did end up buying 2m of a really nice dark stretch demin for Y580/m – amazing value!!

But what I was really looking for here was scissors. I had promised myself a pair of Shozaburo scissors on this trip, and Shozaburo scissors I did get! For Y11000 I purchased a pair of 26cm shears which are an absolute dream to use. I have been using them since I came home and seriously they are like magic!! It’s almost as if I can just wave them at the fabric and the pieces cut themselves 🙂

I couldn’t resist that teeny pair of snips with the beaded handles, either. too cute!

Toroya (Namba, Osaka)

I ended up hitting Toraya twice! Overkill? Nah. On my first trip, there was one fabric I couldn’t decide if I REALLY needed it, so I didn’t buy it. But I decided to go back on my last day to have a second look at their denims, and decided I would get it after all!

At the bottom of the pile is 2m of midweight rigid denim. The purple/green print is a drapy twill knit, probably polyester. The whacky chair print is a light knit fabric. The 80’s denim-look squiggle print is a woven cotton, as is the big floral, although the big floral is a heavier weight.

I got some bag hardware here, and some red velcro – they had sooo many colours of velcro! And the little cat-face things are iron-on felt patches. Kawaii-desu!!!!

Otsukaya (Umeda, Osaka)

I was so silly and didn’t check the opening times of this shop, and turned up on a Wednesday – the only day they are closed!! Luckily my schedule was pretty flexible and I ended up going back there the next day. Boy, was it worth it – this shop is so gorgeous!! (There’s a follow-up post in the works with more about the shops themselves, so you’ll be able to appreciate it!)

See how beautifully packaged they are? Each floor was wrapped separately. On the left is some heavy cotton tape destined for a bag project – probably not the bag pattern shown here though!

Fabrics left to right: upholstery cotton in a deco fish print; two-way denim; Nightmare Before Christmas cotton craft print; floral loopback sweater knit; purple geometric athletic jersey; multicoloured athletic jersey.

No, I didn’t just stop at fabric. There were dozens of cute bag patterns, but I really fell for this simple school bag. Why I bought pins, I’m really not sure – seemed like a good idea at the time. The brass ring is actually a thread cutter you can wear – genius! Can’t wait to try that out. I got some more bag hardware here, too – those turtle magnetic snaps were not being left behind!!!

After that it was time for a brief stop in Dotonbori for some okonomiyaki – yum!

Nippon Chuko (Hommachi, Osaka)

When I first walked in here, I was pretty overwhelmed – I don’t do a lot of bagmaking, but there was soooo much hardware it was hard to not be inspired. When I spotted this wood-panel print I exclaimed out loud – it is EXACTLY what I was looking for, for a project that has been percolating in my head for several months. So of course I ended up finding nearly all the other hardware I needed as well!


The white zig-zag piping and red linen strapping were actually from Toraya – I got my bags of goodies confused when I was photographing everything!

A red/brown chunky zipper, which will go in the same project bag as the woodpanel print, as will the other brass hardware here. The dragonfly print is a kimono cotton, destined for a gift; the dark green textured kimono cotton is for me. I grabbed some coloured elastic too because I couldn’t resist, and a pre-made bag strap which may work with the bag pattern I got at Otsukaya. The fabric pens caught my eye early on – I’ve been playing with fabric decoration lately, and they seemed like good prices, so I selected a few colours.

Atelier to Nani Iro (Osaka)

This shop was gorgeous, but not as cheap as Toraya! I did buy a piece of fabric which I probably don’t need, but this one is most definitely for the ‘collection’. I don’t own many designer pieces so this was a bit special for me. I was tempted by the pattern book as well but decided I own too many patterns already!

I purchased 1.5m of this green spot double gauze. It’s so soft and lovely! It came with a little lookbook of the latest fabric range, which is a symphony in black and white.

I rounded out my trip with a visit to the stunning Osaka Castle. I found it ironic that this castle is contained within a fortress (complete with moat) that was built to withstand an army; and yet today an army walks through the castle gates every day!

I must also mention a very cool spot in Osaka, for the cool people. One of my Discworld friends recommended to me an establishment called The Hearth Cafe, in Osaka in the Namba area. It’s a gaming cafe, and while I don’t game (although LARPing is still on my bucket list), they do a seriously good cheesecake! I was pretty happy sitting at the bar with these guys:

I’ll be following up this post with one detailing more about the shops I went to, and how to get there should you ever get to go fabric shopping in Osaka! If you have been there and shopped your heart out, leave me a comment – I’d love to hear about it!

Also, I’ve been doing youtube videos over the last year or so (could explain the lack of blog posts…. ) so pop over and say hi:

There’ll be a video coming up where I show off this fabric haul in all it’s glory, so don’t forget to subscribe!


Self-imposed refashion challenge:

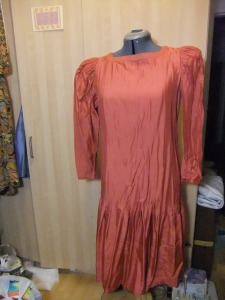
DSCF9161

Aaargh aaargh make it stop!! What is that THING??

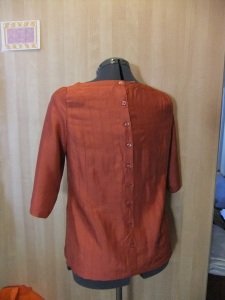
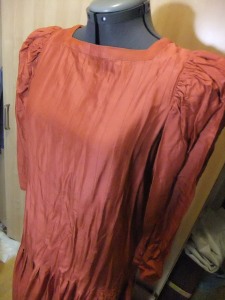
It is a square-necked, puffy-sleeved, drop-waisted, pintucked nightmare in pale maroon. Ye gods. It has a button-up back, too. Here’s a closeup of the bodice:

DSCF9162It had a clothing label, but was made on a domestic machine (zig-zagged seam finishes are always a giveaway there!). No fabric identification label though. It’s crisp and lightweight, irons beautifully, crushes easily and has that almost ‘crunchy’ feel that silk gets after being handwashed a bit too much. I did a burn test and the results seemed to match silk, but I guess we believe what we want to believe.

Anyway, I’d had this monstrosity in my refashion pile for some time. Yesterday afternoon I’d been vacillating between projects, unable to settle on what I wanted to make, pulling out patterns and fabric and generally creating additional chaos in my tiny sewing room. Eventually I gave myself a mental slap and yelled (with my inside voice, of course) ‘JUST CHOP IT UP FOR GOODNESS SAKE’.

So I did.

The fullness of the skirt is created by the bodice tucks, um, stopping, and there’s some gathers at the sides too. I cut the skirt off at that line, and cut the sleeves off as well. There were these big under-puff puffer thingies designed to keep the puffy sleeves from loosing their puffiness. Needless to say they are now in the bin. No puff required in this refashion.

DSCF9165New sleeves were cut from the skirt offcut, using the existing hemline as the sleeve hems, because I’m lazy, and this is a refashion. You know, one of the things I love about refashioning is it allows me to be pretty relaxed about finishes and construction. The thing cost me $3; I’m so not worried about the curved bit of hem which created a little ruck on the inside. It’s on the INSIDE!!! No-one can see it!! Press that sucker from the outside – looks the ticket – job done!

Also not too worried about the sleeve fitting, which was a gamble from the start. I just used a basic sleeve pattern, there was no way I was going to spend time drafting a sleeve head to match this armhole. So the fit at the back of the sleeve is a little wonky. Don’t look to hard.

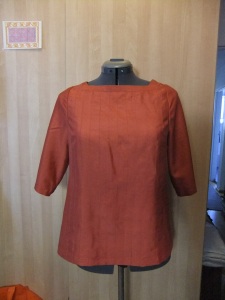
DSCF9166My goal at the moment is to make a few shirts for work now that that weather is getting cooler. I want to have a go at the 2-hour-top by SewDifferent but as usual can’t decide what fabric I want to use. I also caved in and hit StyleArc during their Etsy shop sale and bought the Elita top, which I have fabric for but am dreading tiling the pattern together. I like the slightly boxy-shaped tops that are trending at the moment, and I think I have managed that with this top.

Do you enjoy refashioning? How do you find it compares with from-scratch garment making?

The Activewear course is now over, and I must say that although it kept me rather busy for the last 6 weeks, it was certainly a fun and rewarding experience.

I now have slopers for activewear and enough pattern-drafting know-how to create all sorts of wacky workout wear!

For example, here’s my effort for the Sports Bra.

Sports bra front & back

Don’t judge me on the outer finishes. This is, essentially, a muslin.

I used a printed lycra that had had a previous life as a failed pair of leggings, elastic at the lower edge and plain black lycra for the upper binding and straps. The strap configuration was kind of organic, as in I put the unfinished bra onto Suzanne (that’s the dressmaker’s model, not a real person) and did a bit of ad-hoc draping with the straps.

The course had us sewing in bra cups, but a) I didn’t have any in my stash and b) I’ve never found them to be either comfortable or useful. So instead, I just lined the entire bra with powernet:

sports bra lining

Again, don’t judge me on the finishes.

Anyhoo, I gave this sucker a test run during the week. The compression factor was excellent, but I will have to adjust the front armscye as it was a little too high for comfortable movement. You can actually see that in the first photo.

The course also included shorts and yoga pants, both of which I didn’t make (but may yet return to). However, I used the shorts waistband instructions and drafted a pair of leggings of my very own!

Side stripe leggings

Here’s what my draft looked like.

DSCF9065

It’s all made of the standard slightly-shiny lycra. Here’s a couple of truly terribly pictures of the leggings on me:

side stripe leggings ON

In hindsight (or possibly thighsight) those green panels at the hip hit me at exactly the most unflattering point. “Look world, here’s my widest bit!” Still, I love my sidestripes. This lycra is stretchy-er than the the gray one I used for the previous pair, so the tights aren’t as close-fitting as I would have liked; also the reduction on the waistband wasn’t quite enough to create a nice tight fit.

I solved the waistband problem with some elastic zig-zagged to the upper edge. Things got a little tricky around the in-seam pocket, but I managed. I actually haven’t given these a test run yet – I’ll let you know how they travel!

DSCF9071

So yesterday, all inspired I went and haunted the fabric consignment shops in Marrickville. There’s a lot of truly horrible nasty stuff in those shops, but there’s also some bargains to be had. I got these fabulously raucous printed lycra’s for $12/m.

DSCF9067

I adore that spacy rainbow one on the right. I think that just gets made into a plain pair of leggings with no extra embellishments, and just let the print speak for itself!! These are all nylon/lycra blends (I quizzed the shop guy fairly heavily on fabric content). From what I understand, nylon lycra takes colour a lot better than polyester. Polyester is apparently better for workout wear though, due to it’s hydrophobic qualities (meaning it takes up no water at all, as opposed to nylon which is hydrophilic and will take up a small amount of moisture – hence why it takes colour better!). Then there’s wicking, which is a combination of fibre type, fibre shape and the actual construction of the knit. It’s all terribly complicated. Have a look at this article.

Have you tried making any activewear? What patterns and fabrics have you used?