Self-imposed refashion challenge:

DSCF9161

Aaargh aaargh make it stop!! What is that THING??

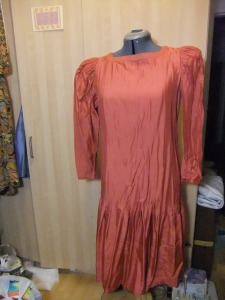
It is a square-necked, puffy-sleeved, drop-waisted, pintucked nightmare in pale maroon. Ye gods. It has a button-up back, too. Here’s a closeup of the bodice:
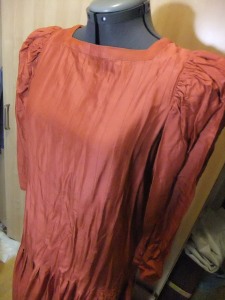
DSCF9162It had a clothing label, but was made on a domestic machine (zig-zagged seam finishes are always a giveaway there!). No fabric identification label though. It’s crisp and lightweight, irons beautifully, crushes easily and has that almost ‘crunchy’ feel that silk gets after being handwashed a bit too much. I did a burn test and the results seemed to match silk, but I guess we believe what we want to believe.

Anyway, I’d had this monstrosity in my refashion pile for some time. Yesterday afternoon I’d been vacillating between projects, unable to settle on what I wanted to make, pulling out patterns and fabric and generally creating additional chaos in my tiny sewing room. Eventually I gave myself a mental slap and yelled (with my inside voice, of course) ‘JUST CHOP IT UP FOR GOODNESS SAKE’.

So I did.

The fullness of the skirt is created by the bodice tucks, um, stopping, and there’s some gathers at the sides too. I cut the skirt off at that line, and cut the sleeves off as well. There were these big under-puff puffer thingies designed to keep the puffy sleeves from loosing their puffiness. Needless to say they are now in the bin. No puff required in this refashion.
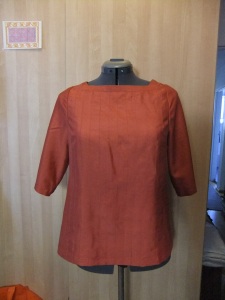
DSCF9165New sleeves were cut from the skirt offcut, using the existing hemline as the sleeve hems, because I’m lazy, and this is a refashion. You know, one of the things I love about refashioning is it allows me to be pretty relaxed about finishes and construction. The thing cost me $3; I’m so not worried about the curved bit of hem which created a little ruck on the inside. It’s on the INSIDE!!! No-one can see it!! Press that sucker from the outside – looks the ticket – job done!

Also not too worried about the sleeve fitting, which was a gamble from the start. I just used a basic sleeve pattern, there was no way I was going to spend time drafting a sleeve head to match this armhole. So the fit at the back of the sleeve is a little wonky. Don’t look to hard.
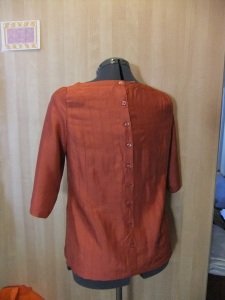
DSCF9166My goal at the moment is to make a few shirts for work now that that weather is getting cooler. I want to have a go at the 2-hour-top by SewDifferent but as usual can’t decide what fabric I want to use. I also caved in and hit StyleArc during their Etsy shop sale and bought the Elita top, which I have fabric for but am dreading tiling the pattern together. I like the slightly boxy-shaped tops that are trending at the moment, and I think I have managed that with this top.

Do you enjoy refashioning? How do you find it compares with from-scratch garment making?
I found this awesome Hawaiian-print cotton sundress at Vinnie’s for $7.

DSCF8304

It was huge though. I didn’t even try it on, just went ‘Yeessss!’ and threw it in my basket. Look! Pockets!

DSCF8305

The neckline and sleeves were nicely finished with facings so I decided to take a different approach in smallerizing the top part of the dress.

DSCF8307

The shoulder straps were really wide, so I folded them in half and darted out a couple of centimetres, taking the dart down almost the depth of the armhole at the front and back.

DSCF8308

Then I stitched along that line, and pressed it flat – it sat perfectly. I was so happy!

Of course, I wanted to keep the pockets, so taking in the side seams was not quick – I unpicked the pockets from the side seams, trimmed the sides down, and re-sewed the seams with the pockets. It had been a while since I had done a side-seam pocket, but I managed! As usual though, I got a bit carried away and forgot to take pictures of this bit.

Now the original bust dart was pretty generous, so when I let that out and put in a Laura-sized bust dart, the front of the dress was a few centimeters longer than the back! ooops. Now, it would have been easy to chop the front the match the back, but the fact was it was a pretty short skirt already. So I managed to salvage some strips from the side seams to lengthen the back.

DSCF8317.V2

It’s still a little short, but I’ll  happily wear it as a beach coverup. In cooler weather it might look cute with tights, boots and a denim jacket.

DSCF8319

It was sunny last week when I made this dress, although it is raining now, but still warm and humid.  Props to any readers in the northern hemisphere undergoing snowstorms – stay safe!

Red Dress Refashion 1

I found this red dress on the sale rack at Vinnies. The fabric is a crinkly viscose, and it has some nice pin-tuck detailing on the bodice. I thought it had potential – my before pic is a bit dark, but it’s a bright cherry red, and there’s lots of fabric to work with.

The previous owner had blinged it up a little:

DSCF8098

They only replaced four of the original buttons with these gold-and-glass babies. For whatever reason, they sewed three of the original buttons on the backs of these new ones. Weird. Still, I was probably going to have enough buttons for my purpose.

Sadly, I realised why this dress was on the $2 rack. There were tons of holes around the lower edge of the dress.

DSCF8101

This thwarted my original plan of a maxi-skirt or even a hi-lo maxi-skirt – there was just too many holes to work around. So, I decided to make a sun-dress instead.

I used another dress as a pattern, tracing around it to get armholes and adjust the side seam a bit.

DSCF8102DSCF8106

Using the same dress to get a hi-lo hem as well.

DSCF8104

Chop!

Chop!

Then I sewed up the new side-seams, carefully replacing the original waist ties, and folded, stitched and pressed the hem.

I was going to use some of the leftover fabric to make bias binding for the armholes, but this fabric was really stretchy and mobile and basically a complete pain to work with. So I just used some black satin bias binding from my sewing box. I sewed it on the outside first, then folded it to the inside and used the ‘stitch in the ditch’ technique, sewing from the right side of the dress and catching the edge of the binding on the inside.

Sewing the bias to the right side of the armhole edge.

Sewing the bias to the right side of the armhole edge.

Stitching in the ditch, from the right side.

Stitching in the ditch, from the right side.

Remember how I mentioned the original buttons being sewn on the inside of the dress? Well, with those three and two more salvaged from the lower offcut of the skirt, I had enough to replace the four nasty gold buttons, plus a spare.

Here’s the finished product!

DSCF8115

It’s breezy and comfy to wear. I have a feeling it will get used quite a bit this summer!

DSCF8117

In other news…. while checking out some op shops in my current suburb, I came across this adorable sewing table.

DSCF8149

It was $20 which was probably a bit more than I would have thought, but it suited my purposes so perfectly I didn’t really mind! Look, made for sewing:

DSCF8146

The green floral fabric is two napkins which cost me all of 50c at another op shop. At the time I had no idea what they would get used for. Turns out they were destined for this little table!

I can also use this as a study table – perfect size for my laptop. And, it’s on wheels, so I can move it around in my borrowed bedroom to wherever is convenient at the time!

Hello friends! Well, you may have noticed there has been a bit of a hiatus in the refashioning stakes lately. This has been due to an interstate move. Most of my belongings are now in storage, including the majority of my stash… sigh. Still, I kept out a few choice potential refashions, and the trusty Ms Janome made the road trip with me. So, in fact, did Suzanne:

?????????????!

I did get an odd look from the friendly copper who stopped me for a random breath test.

Eldest sibling kindly made her spare room available to me, so I have a temporary home until I decide where I would like to hang my hat. So many trendy suburbs…. wait, I’m not trendy. I’ll have to find a suitably daggy suburb. One where I could wear this:

Laura Ashley much?

Aaaargh! How 80’s is this little number. I liked the fabric though (a crisp rayon) and the pleat detail across the bodice. And the label:

DSCF8135

It’s got chocolate in it, so it has to be good.

I actually started this one some months ago, but you know how it is… you realise you’re going to have to do something fairly complicated (in this case, re-setting the back zipper) so you set it aside in favour of something more instantly gratifying. Unfortunately I didn’t take many pictures of the process of this one, so I’ll just describe it as best I can.

First of all I hacked off a fair bit of length. Then I chopped off the sleeves and put it it onto Suzanne inside-out to make some adjustments. I took off quite a bit around the armholes to give the bodice a new look. I did consider adding short sleeves back in but decided against it.

I realised at this point that like many dresses on me, there was waaay too much material at the centre back neck – if I stood up straight it poked out about 2 inches! So that was when I decided to do something else for a while.

The dress did sit on Suzanne for a couple of days, so I did at one point even out the hem once it had hung for a while. It’s a fairly full skirt so getting the hem even was a little fiddly!

I unpicked the top 15cm of the zip, folded the excess back and re-sewed the zip. I had to add a little bust dart at the front armhole, which I ingeniously managed to hide under one of the wide pleats. I used one of the sleeves to make some bias binding to finish the armhole edges, and a strip from the other sleeve to make some belt loops to sew on around the waist.

DSCF8136

If you can see how the bottom pleat looks a little wonky, that’s where I hid the bust dart.

I did have to periodically stop and play with my new sewing assistant, Zuki.

Mrow!

But eventually I managed to produce this!

DSCF8132

I think the contrast belt really makes it. I’ve tried a couple of different ones and it works with black too. Looking forward to wearing this to work!

Floral Dress 2